6.相机:引入Camera类
6.1.引入CGLib库
- 下载cglib:cglib.net
- 课程目录下新建
dependencies文件夹,将cglib库放进去;注意在.gitignore文件中添加如下两行,以忽略依赖库文件;
#dependencies
dependencies/
- 在
src目录下的cmakelists文件中的find_package后添加如下内容以使用CGLib库,
#CGLib
set(CGLib "${CMAKE_SOURCE_DIR}/../../dependencies/CGLib")
if(WIN32)
    include_directories(${CGLib}/include)testFunc/lib)
    link_directories(${CGLib}/bin/win64/Release)
    link_libraries(CGLib.lib)
endif()
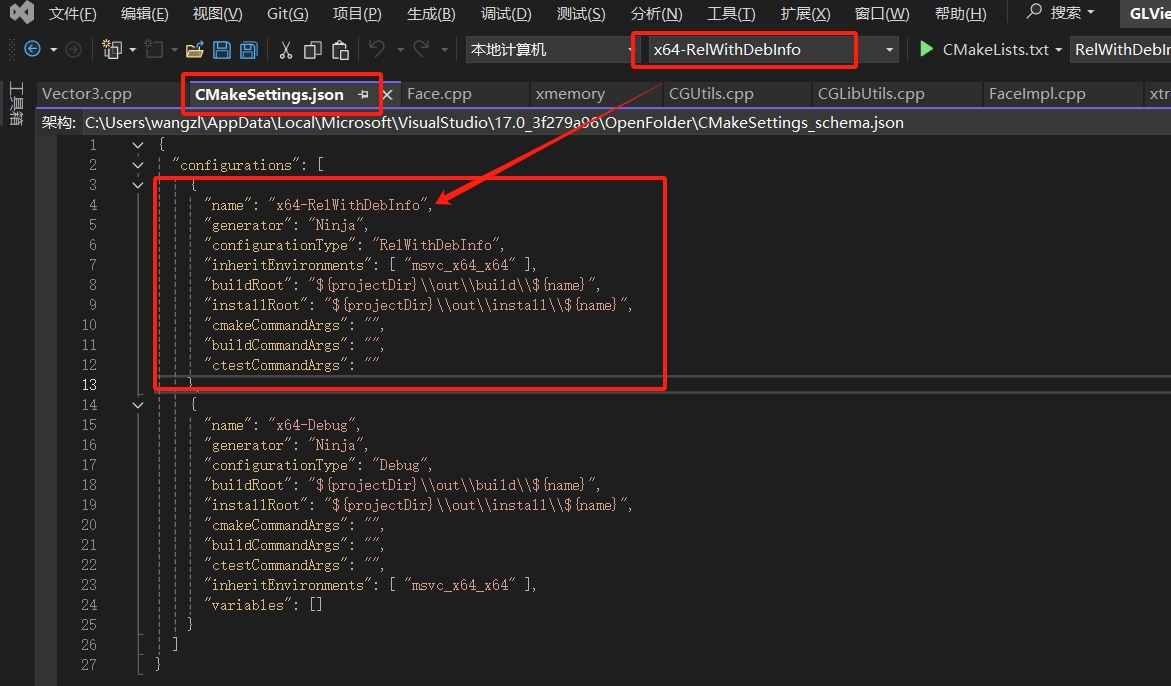
- 还有一件事,迟早得做,现在做了吧,把CGLib的dll和pdb文件拷贝到本项目的输出目录中(GLViewer.exe所在目录),默认是这里
out\build\x64-RelWithDebInfo\src,如果没有更改的话。
Important
建议用ReleaseWithDebugInfo配置进行开发和调试。由于CGLib是Release下编译的,对外接口的参数有STL容器,这样在程序中用Debug配置时运行就会出现报错。当然后续会考虑封装参数来避免此问题。

6.2.添加ViewerSetting类
获取当前客户端设备像素比,并进行适配。
补充:
设备像素比(devicePixelRatio):指当前显示设备的物理像素分辨率与CSS像素分辨率之比。这个比值可以理解为像素大小的比率:一个CSS像素的大小与一个物理像素的大小。简单来说,它告诉浏览器应使用多少屏幕实际像素来绘制单个CSS像素。
- 在VS2022中切换到cmake项目视图,


在弹出建议的cmake脚本更改建议窗体,我们取消即可,认真的同学应该明白个中缘由~

如果项目视图的src下没有出现新添加的ViewerSetting代码文件,可能因为cmake配置需要更新,点击配置缓存或删除缓存并重新配置,

在ViewerSetting.h中添加代码,并记得在cpp文件中定义。这是因为不同客户端屏幕的缩放比例可能不同,需要进行适配,
class ViewerSetting
{
public:
    //  适配不同客户端屏幕缩放比例
    static float devicePixelRatio;
};
我们需要读取当前客户端的这个值并记录:在main.cpp中添加如下代码,
ViewerSetting::devicePixelRatio = QGuiApplication::primaryScreen()->devicePixelRatio();
#include <QApplication>
#include <QGuiApplication.h>
#include <QScreen.h>

#include "glwindow.h"
#include "ViewerSetting.h"

int main(int argc, char *argv[])
{
    QApplication a(argc, argv);
    ViewerSetting::devicePixelRatio = QGuiApplication::primaryScreen()->devicePixelRatio();
    GLWindow w;
    w.show();
    return a.exec();
}
恭喜你,添加成功,但可能编译报错哦,我们使用了QT的Gui库,可能找不到,我们还需要更新下cmakelists文件对应位置添加如下脚本代码,
find_package(Qt6 REQUIRED COMPONENTS Gui)
target_link_libraries(GLViewer PRIVATE Qt6::Gui)
注意:
记得编译一下,确保通过;
6.3.添加ViewerUtils类
//  ViewerUtils.h
#pragma once
#include "CGUtils/CGUtils.h"

using namespace CGUTILS;

class ViewerUtils
{
public:
    //  返回6个坐标轴(包含正负轴)中与dir最贴近的轴
    static Vector3f normalizeToAxis(const Vector3f& dir, const Vector3f& localX, const Vector3f& localY, const Vector3f& localZ);
};
//  ViewerUtils.cpp
#include "ViewerUtils.h"

Vector3f ViewerUtils::normalizeToAxis(const Vector3f& dir, const Vector3f& localX, const Vector3f& localY, const Vector3f& localZ)
{
    double angleX = localX.Angle(dir);
    double angleY = localY.Angle(dir);
    double angleZ = localZ.Angle(dir);
    double rAng90 = PI / 2.0;
    bool bTX = angleX > rAng90;
    bool bTY = angleY > rAng90;
    bool bTZ = angleZ > rAng90;
    if (bTX)
        angleX = PI - angleX;
    if (bTY)
        angleY = PI - angleY;
    if (bTZ)
        angleZ = PI - angleZ;

    if (angleX < angleY && angleX < angleZ)
        return bTX ? -localX : localX;
    else if (angleY < angleX && angleY < angleZ)
        return bTY ? -localY : localY;
    else// if (angleZ < angleX && angleZ < angleY)
        return bTZ ? -localZ : localZ;
}
聪明的你已经发现,我们也成功使用了此前引入的CGLib库~
6.4.添加camera.h
直接将camera.h文件复制到src下,或者用上述添加类的办法添加camera.h,然后复制代码进去。
确保编译通过,如果不通过就解决问题,直到通过,解决问题的办法很多,比如看本课程系列对应视频,教程文档,或者搜索,或者在群里问......
然后来到了本节课程的重头戏部分,使用camera吧~
- 在
GLView类中添加Camera成员字段,
Camera m_camera = Camera(this, QVector3D(0.0f, 6.0f, 10.0f));
- 在
GLView.cpp中initializeGL函数实现中添加如下代码,更新时间,
m_camera.lastFrame = QTime::currentTime().msecsSinceStartOfDay() / 1000.0;
- 在
resizeGL函数实现中添加如下代码,每次窗口尺寸变化都会更新,注意我们偷偷添加了glViewport调用,是为了让渲染管线正常工作,想起来了没?在处理为标准化设备坐标后,需要通过视口变换映射到屏幕像素上。
glViewport(0, 0, w, h);
m_camera.SCR_WIDTH = w;
m_camera.SCR_HEIGHT = h;
- 我们来到了
paintGL函数实现,首先添加如下代码,更新每个渲染循环的时间间隔deltaTime,
float currentFrame = QTime::currentTime().msecsSinceStartOfDay() / 1000.0;
m_camera.deltaTime = currentFrame - m_camera.lastFrame;
m_camera.lastFrame = currentFrame;
如果你这几天睡得足,那么你应该记得我们此前设置的view-matrix和projection-matrix为单位矩阵,那是临时的,赋予它意义的时刻到了,
m_projectionMat.setToIdentity();
m_projectionMat.perspective(/*qDegreesToRadians*/(m_camera.Zoom), (float)m_camera.SCR_WIDTH / (float)m_camera.SCR_HEIGHT, 0.1f, 100.0f);

m_viewMat = m_camera.GetViewMatrix();
- 嗯?应该是鼠标控制相机的运转呀,对的,我们一起来实现~
重写
event函数,让camera捕获鼠标、键盘事件,嗯,至于怎么处理是它的事情了,
//  GLView.h
virtual bool event(QEvent* e);

//  GLView.cpp
bool GLView::event(QEvent* e)
{
    makeCurrent();

    if (m_camera.handle(e))
        update();

    doneCurrent();
    return QWidget::event(e);
}
如果正常的话,你可以通过鼠标操作相机,试着按住鼠标左键转动、按住鼠标右键移动、滚动鼠标滚轮,你会看到不同的效果~

思考:
为什么鼠标在三角形上左键旋转时,没有以此为旋转中心呢?
我们回顾下本节所作的事情,添加相机,并在GLView中去使用调用它,至于其它事情都是围绕这个目的展开的。
提示:
- 作者在
视频课程中对相机原理和实现有详细的讲解,包括原理和代码逻辑,欢迎观看; - 作者在第31节课程中讲解了缩放时以鼠标点为中心的原理逻辑和实现,欢迎观看。